Review: Carolina Biological Premium DNA Keepsake Kit
Buy a kit, or use what ya got?
Now, I normally use basic household items to do the DNA extraction activity with my kids, but I grabbed myself a DNA extraction kit from Carolina Biological for the funsies (I am not sponsored by Carolina Biological). The Premium DNA Keepsake Kit is a beginner kit that comes in 1-station (demonstration), 12-station, and 24-station (classroom) sizes and is conveniently available for residential shipping. Carolina also has a 36-station version that does not include the pendants. That pack is much cheaper for a large set of participants, but it is not shipped residentially. Let’s go through and compare the kit to the DIY version!
Cost:
Demonstration kit - $27.00
DIY - probably not much, anything you don’t have lying around can be found at the dollar store
Kit materials:
- Premium DNA Keepsake Kit Teacher’s Manual and Student Guide
- 1 oz. plastic cup
- 100mL 70% denatured ethanol
- 1 microcentrifuge tube
- 1 bottle of sports drink
- 3 3 mL graduated pipettes
- 1 15 mL conical tube
- 1 DNA keepsake pendant
- 1 pack of embroidery thread
- 25 mL of cell lysis solution
At home materials:
- A glass of water (or sports drink)
- Isopropyl Alcohol (70% or higher)
- Dish soap
- Table salt
- A small glass or container
- Straws (optional)
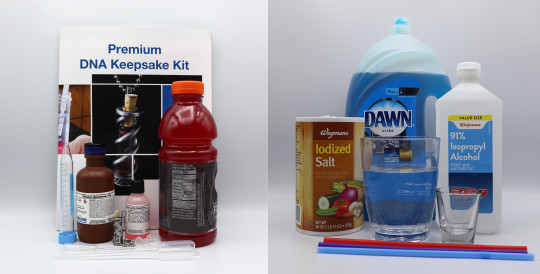
Carolina Biological Kit (left) and DIY kit (right).
Always make sure you are following safety guidelines. Only work with your own cells, and wash your hands after handling any of the liquids in these activities. If you are sensitive to alcohol, dish soap, or coconut DEA, you should wear gloves. Lastly, do not swallow any of the materials used in these activities. Before getting into either activity, the ethanol and/or isopropyl alcohol need to be put in the freezer for at least an hour. Chilled alcohol makes the DNA come out more quickly.
Both the Carolina kit and the DIY version require you to collect cheek cells by swishing liquid around in your mouth and scraping your cheeks. The Carolina kit comes with a sports drink for this purpose because the salts in the drink make it less damaging to cells than pure water. I found that tap water works fine, though. I did not see a significant difference in amount of particles in the spit between the two.
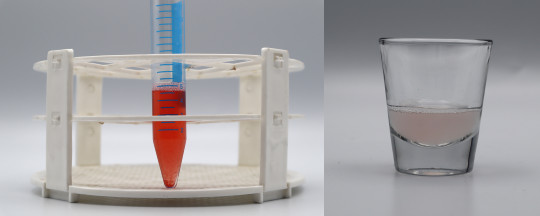
Carolina Biological spit (left) and DIY spit (right).
After collecting the cells, they need to be broken open using a lysing agent. Lysing is breaking the cell membrane. For the at home version dish soap, water, and salt get mixed together. The Carolina kit comes with a pre-mixed solution of detergent and salts. The detergent lyses the cells by acting as a link between the water and the fats in the cell membrane. Normally water and fat repel each other, but the detergent allows the water molecules to pull the fat molecules apart. The salts are to counteract DNA’s preference for avoiding itself. The salt is like a positive magnet on DNA’s negative one, it makes it neutral so that it doesn’t repel itself. While there wasn’t a significant difference in yield with either method, the pre-mixed solution from Carolina was the clear winner for convenience.
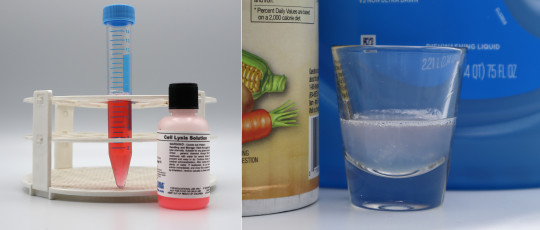
Carolina Biological lysate (left) and DIY lysate (right).
With the cells broken open, the DNA is floating free. We can’t see it because it’s dissolved in the water. To get it to precipitate out of the water, we use alcohol. The Carolina kit comes with 70% ethanol, and you probably have 70% isopropyl alcohol in your medicine cabinet or electronics kit. I happened to have 91% isopropyl alcohol so that’s what I used this time. The higher the alcohol content, the better it’s supposed to work. The alcohol needs to be added in a way that doesn’t disturb the lysate (the mixture with the broken open cells in it). Using a pipette or a straw to add the alcohol slowly down the side of the container is an easy way to do this. Once the alcohol is added, you just wait for the DNA to appear in the clear alcohol layer.
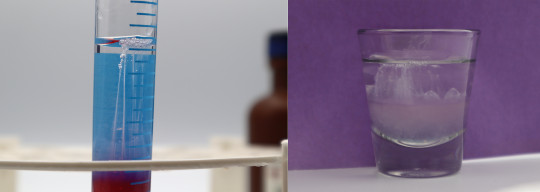
Carolina Biological DNA (left) and DIY DNA (right).
With the Carolina kit, there’s an extra step that’s pretty cool. The kit comes with a pretty high quality necklace to hold your DNA in. You can use a pipette or a toothpick to gather the DNA and transfer it to the necklace. The Carolina manual has a beautifully in depth description for how to this using the pipet. If you use a toothpick, wrap the DNA around the toothpick.
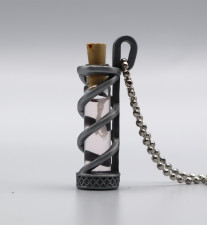
Carolina Biological super cool necklace with my DNA in it.
Overall, I didn’t notice a significant difference in yield. The Carolina kit was more convenient in that the lysing agent was pre-mixed, it came with all the tools and reagents boxed together, and I didn’t have to do any dishes afterward. The DIY version is much cheaper, but doesn’t come with the nifty necklace. The biggest advantage to the Carolina kit, though, is the manual. If you are using this activity for homeschooling or education, rather than just for something fun and sciencey, the manual has an explanation about DNA spooling, what each step in the activity does, and it has a lab report form. The manual also includes a pre-lab activity involving wrapping embroidery thread in different ways to make it fit in a small space like DNA when it is neatly packaged. Also included with the manual are digital resources for teaching.
If you have the money, want a more structured and laboratory like experience, and/or want a more textbook version of the activity, you could certainly go for the Carolina kit. If you are doing this activity with a large group of participants, the Carolina kit is the way to go for quick prep-time and a low failure rate. There’s no reason you can’t look up any of the information in the manual on the internet, though, and the DIY version is virtually free. It really depends on what your goal for the activity is and how much time you want to put into prepping it.
Share this post
Twitter
Facebook
Reddit
Pinterest
Email